Hi there, welcome to my blog - La Revolution Deux. It's an odd name - but I like it! Here you will find all the info on my various DIY Guitar effects builds, amplifiers and guitars. Everything from a humble Ibanez tubescreamer to the holiest KLON Overdrive.
You may also find a few effects builds that I am looking to move on - usually in exchange for other effects/gear/cash. You can always check my ebay account to see what I've got up for grabs.
Have fun, enjoy the blog - Fred Briggs :-)
CONTACT ME
Feel free to get in contact with me about anything you see on this blog or with any general questions about guitars, amplifiers and effects, I'll be happy to answer! Just click the button above to email me directly or alternately my email address is fredbriggs2007 [at] googlemail [dot] com
Check this schematic out for the critically acclaimed (and very popular with big stage acts!) Friedman BE-100.
It's a fairly standard hot-rodded Marshall design with a few interesting twists - the "Sat" clipping control off the cathode follower and the FX loop design (which I believe is the MetroAmps loop design).
Also check out the way the global negative feedback is applied - it's level changes depending on which impedance tap the amp is set to output to. This could be intentional OR it could be a layout error. I've checked this on a real BE-100 and it is actually wired like that!
If you're looking for a five to nine watt practise and recording amplifier - build this, it sounds great and only uses two valves!
It's got a special mosfet based phase splitter design which I've not seen anywhere before - so I'm claiming my design is unique :-)
If you're interested in guitar amplifiers and haven't heard of Trainwreck amps then you must be stuck on a desert island. Known for their no frills design, great clean shimmer and screaming lead tones Trainwreck amplifiers were hand made in the 80s and through the 90s by the late Ken Fischer. He was one of the first "boutique" amplifier manufacturers to enter the market and many of his design philosophies, construction techniques and circuit designs are still around in the amplifier market today.
An unbelievable collection of Trainwreck and Vox amplifiers
There are three main Trainwreck designs;
the "Express", a 50W screaming lead machine using 2 EL34 output valves to generate super compressed lead guitar tones.
the "Liverpool", a 30W combination of the Express preamp alongside a quad of EL84 output valves to create a slightly mellower version of the Express. Ken designed this one with single coil guitars in mind.
the "Rocket", a super fine tuned version of the VOX AC30 Top Boost.
Unfortunately Ken only managed to produce around 100 or so amplifiers before his health deteriorated to the point where he was unable to build - this makes original Trainwrecks rarer than hens teeth (or in fact rarer than original Lovepedal circuit designs ;).
Now, before we go any further and take a look at the actual circuits we should probably have a listen. Here's some demo videos of the Trainwreck amplifiers in action;
So there they are, some pretty decent sounding amplifiers. But we want to know how to build them. There are literally thousands of forum posts and discussion on these amplifiers and a few kind owners of originals have taken pictures of their amps to allow others to attempt to clone there sound. Most of this information is stored on the great Tube Amp Garage Forum (which also covers the much sought after Dumble amplifiers).
A 1989 Trainwreck Express
"Ingrid" Trainwreck Express
Gutshot of Ingrid
Now, first up is the Trainwreck Rocket schematic;
The Trainwreck Liverpool Schematic;
And finally the Trainwreck Express Schematic;
Notice the similarities between the Liverpool and the Express - same preamp circuit different power amp. Also notice how they use that third triode "cold biased" to get some real preamp clipping going in much the same way as the great Marshall JCM800 (2204) does. The Rocket, as you can see, is just the top boost Vox AC30 refined to a single channel.
On their own the circuits are nothing spectacular; the key with these amplifiers is in their construction and tube selection (and transformer selection - the Express uses a custom build output transformer with a 6k6 primary and the Liverpool a, rather odd, 5k2 primary (usually quad el84 amps use an output transformer with a 4k primary winding)) - if you don't get these factors correct then you'll have an amp that sounds all right, but it won't sound like a Trainwreck. But how do you select tubes for Trainwrecks and tweak them to perfection? Well, it's back to reading all those forum posts and filtering out the truth from the myth and being prepared to lay out some serious cash on NOS tubes!
Below are the links for a full BOM (Bill of Materials) and Layout files for each of the Trainwreck amps.
So, if you've heard of the Japanese pedal company Vemuram you've probably heard about this: Vemuram Jan Ray = Timmy Clone. It's an attractive pedal - nice brass enclosure, vintage looking knobs. Check it out in action here against the Timmy (yes, there are slight differences - the treble control has a different range and the OPAMP chip is different but the circuit structure is exactly the same.);
Now, the Timmy (the original which is made by Paul C and has been since 1997) has been cloned several times in the past by many different manufacturers. Off the top of my head there's the Danelectro Cool Cat Transparent Overdrive and the Lovepedal OD11.
Well we have mmolteratx to thank for discovering this latest example of boutiquer cloning. He picked one up and gutted it before tracing it out and providing a schematic for us;
Vemuram Jan Ray Guts
Vemuram Jan Ray Guts
And here's the schematic he drew up;
Yeah, it's a Timmy with a slightly altered treble control. Here's an explanation from mmolteratx;
"No, it's entirely in the different treble control. The bass response is exactly the same, all the trimmer does is vary the effective value of R4, which sets the gain of the stage. The treble control on the Jan Ray lops off everything above 2.8kHz at -6dB/decade at max. The Timmy's control at minimum does the same, but at 10.6kHz. Just use the Timmy's control in a different range and you've got a Jan Ray."
I like collecting BJFe designs, I like their simplicity and the fact that they sound really good. Here's one of Bjorn's latest offerings - the Baby Pink Booster.
Here's the description from the Bearfoot FX website;
"+15 dbs of clean guitar friendly boost and a tasty buffer ... Deluxify your drives ! If you've seen the very expensive BJFe Honey Bee and Baby Blue and Emerald Green 'Deluxes' .... this is whats in there besides the drive circuit ---- the BPB is the buffer and the boost for those ---- so put the BPB at the end of your dirt section and 'Deluxe' them all. 8-18v for more headroom and clarity if needed"
Gutshot of the Bearfoot Baby Pink Booster
And, as usual, a YouTube clip of the offending pedal "in action" alongside some late 80s haircuts;
And here's the schematic provided by mmolteratx;
There you go, a simple jfet setup that runs at unity gain without the boost pot wiper connected to ground and boosts when the effect is engaged. For most fun - run this thing from 18 volts for extra gain and fun. You'll need to select the jfet as to get it biased correctly, go for one that gives you around 4.5v on the drain (or just one you like the sound of).
For more info and a few vero layouts check out this thread at freestompboxes.org; http://freestompboxes.org/viewtopic.php?f=7&t=22020
The Wampler Ecstasy has recently been renamed the "Euphoria", for what reasons I'm unsure but it could be to do with a few not-so-positive forum topics popping up on google when you search for Wampler Ecstasy! I thought I'd already covered this one but a quick trip over to IVIark's tagboardeffects.blogspot.com reminded me that I haven't! The general circuit topology has been known for a while after Brian Wampler kindly got stuck in and posted a few hints over at the freestompboxes.org forum;
"Here's the thinking along the design of the ecstasy. The idea was to boost the bass to fuzz up the bottom end a bit, yet retain soft clipping. So there's a pot to a big cap (nfb to ground), variable low pass filter as a tone control, simple gain boost opamp stage after this. [The] switch adds in diodes to 4.5v ref (IIRC!), soft clipping only, or no diodes which is all opamp clipping. Simple design, but works and sounds great."
Gutshot of the Wampler Ecstasy Overdrive
So let's have a read of the description of the Ecstasy / Euphoria from the Wampler website;
"When Brian created the circuit that would eventually become the Euphoria, he was working on creating a pedal that would go from clean tones to distorted tones while adding a bit of warmth. He wanted something for himself that would be dynamic, have a great sounding “gritty” tone to it yet be able to respond to the volume knob like a tube amp. Everything about Brian is in the dynamics of sound and if a pedal can't work with him dynamically, then he just can't use it.
The Euphoria is his take on that elusive tone and feel made famous by Dumble Amplifiers - smooth creaminess yet crunchy when you need it to be, yet the tonality is much more transparent than other “dumble sounding" pedals. Very responsive tone controls that interact with the pedal - they don't just “color” the sound. The controls actually affect the response and feel of the pedal, just like a great tube amp.
If you love the sound of your clean tone, and just wish you could have more “hair” on the note... a little bit of grit without any change in tonality, the Euphoria will do that with ease. PLUS it's extremely flexible... with the toggle switch in the down position you'll get a hint of fuzz along with the overdrive, it's reminiscent of the tones that "Eric Johnson" may use. With the toggle in the up position the tonality is super smooth, creamy yet crunchy when you dig into the strings.
This is reminiscent to the famous “Dumble” tone, though it's really much, much more than that. In the center position, the toggle will give you tons of crunch, or roll the gain back a bit and push the volume up and you have a superior clean boost with a 2 band EQ that's extremely transparent, but variable so you can actually turn it into an awesome treble booster just by cranking up the treble and turning the bass down."
Here's a ProGuitarShop demo video of the Ecstasy / Euphoria in action;
Now we've heard it lets see the reversed schematic;
Note that the schematic is a screen grab from modelling software - you don't need the three seperate voltage dividers which provide 4.5v, a single voltage divider will do with all of the points that need connecting to 4.5v pointed there. the 12.5k/12.5k resistors in the filter at the rear of the circuit are in fact a 25k pot with it's middle lug connected to the 22nF cap. The opamp (as seen in the gutshot above) is a JRC4580D.
So looking at the circuit layout it's pretty simple - tubescreamer/voodoo labs overdrive hybrid with a treble roll off control. The switching goes between soft/none/hard clipping options and the bass control is the same bass control as is seen on PaulC's Timmy Overdrive.
So, on the topic of "Voxy" sounding boxes here's another - the Catalinbread CB30. Most of you who read this blog regulary will know that I do like Catalinbread pedals; they always sound good and their aesthetic appeal and build quality is top notch. Unsurprisingly the CB30 is no different.
Here's the description from the Catalinbread website;
"The CB30 is designed to give you jangly, dynamic, responsive overdriven tones, just like it's British 30 watt counterpart. The tone controls work exactly the same way as the actual amp, where the more the treble and bass increase, the more scooped the mids become, making it capable of being quite hollow and jangly. The CB30 can be dialed in for that immediate attack, compressed mid range honk, finished by the shimmery high end jangle, an elusive sound for many players. Like all the foundation pedals in our line it sounds excellent on its own, or when stacked with other pedals (no really, just wait until you put a treble boost in front!)
As owners of the real deal know, the amp has an amazing touch sensitivity, with the ability to go from clear and chimey, to that unique overdrive character with just your picking dynamics. The CB30 has the same response, and cleans up extremely well with your guitar's volume control. The CB30 is true bypass, and comes in a rugged silkscreened case, has black aluminum knobs that feel great, and are easy to see on stage. If you're looking for an expressive, chimey overdrive, we think you'll enjoy the CB30 for years to come."
Here's a demo video of the Catalinbread CB30 in action;
Here's a schematic from mmolteratx;
It's similar in structure to the Catalinbread Dirty Little Secret and Formula No 5; a dual mu-amp design with a tonestack taken from the amplifier family it's looking to emulate. There are a few interesting little additions to this circuit though - C6 & R2 form a gain lowering feedback arrangement for higher frequencies and the 470pF C7 really restricts low end signal from exiting that first mu-amp stage.
Some people have complained that the CB30 lacks a little gain, I'm not sure it does but here are a few mods and suggestions which will allow you to pump up the available gain without removing too much of that Vox character;
Reduce the value of R1 (maybe 10k),
Increase the value of C4 (47n or higher),
Increase the value of C7 (1n-10n),
Remove R7 or just reduce it's value,
Make Q5 a jfet gain stage instead of just a buffering stage.
NOTE - these modifications will alter the frequency response of the pedal somewhat, it's about tweaking it to your taste while attempting to retain that Vox character!
Another favourite modification I like to use with mu-amp type circuits is an increase in supply voltage, it nearly always has a positive impact on the tone of the circuit. Pumping up the voltage from 9 to 18v opens up more dynamic headroom and pushes the gain up just a touch. Even though when playing mu-amp circuits at 9v they feel like an amplifier the higher you go with the voltage the more convincing they get. Push the voltage up to a limit of 25v as that is the limit for 2N5457 jfet type devices, any more voltage than that and you'll cook 'em!
I've not covered many Vox sounding pedals on the blog so I thought I'd stick one up - the HipKitty Oxblood Distortion. It's supposed to be able to turn your huge full stack into a little boxy Vox AC15! Right-o..
"The Oxblood Distortion was designed to emulate the tone and response of an old Vox AC15 with added gain at the input stage. Unlike other Vox-like pedals which emulate the tone and response of the Vox AC30, only the Oxblood Distortion emulates a boosted AC15.
Unique to the Oxblood Distortion is it's ability to make a "large" amp sound "small" and in hyper-drive with the tone of the AC15.
Also unique to the Oxblood Distortion is it's controlled output. While other distortion pedals use greater than unity gain at output to alter the user's amplifier input stages, the Oxblood Distortion does not. This keeps the true tone and response of the effect intact throughout the initial preamp stage of the amplifier in use."
And a demo video of the Oxblood Distortion in action;
It is quite an interesting tone - very boxy, it really does seem to make an amp sound smaller! Here's the schematic, it's yet another one of WhiteKeyHole's;
So, it's not a complex circuit - broken down it's a buffered silicon fuzz face with a treble cut control. The first transistor stage is a simple emitter follower, the second and third transistor stages make up the fuzz face with the treble cut control tacked on the end - that's it! The 10k trim pot is used to bias the fuzz face correctly, you can use it to dial in the sort of overdrive you're looking for - anything from around 4v to 7v on the collector of Q3 sounds decent. So why does it make the amp sound small? It's due to those small coupling capacitors - they cut the bass content down and really accentuate the middle and treble frequencies this gives that "boxy" tone.
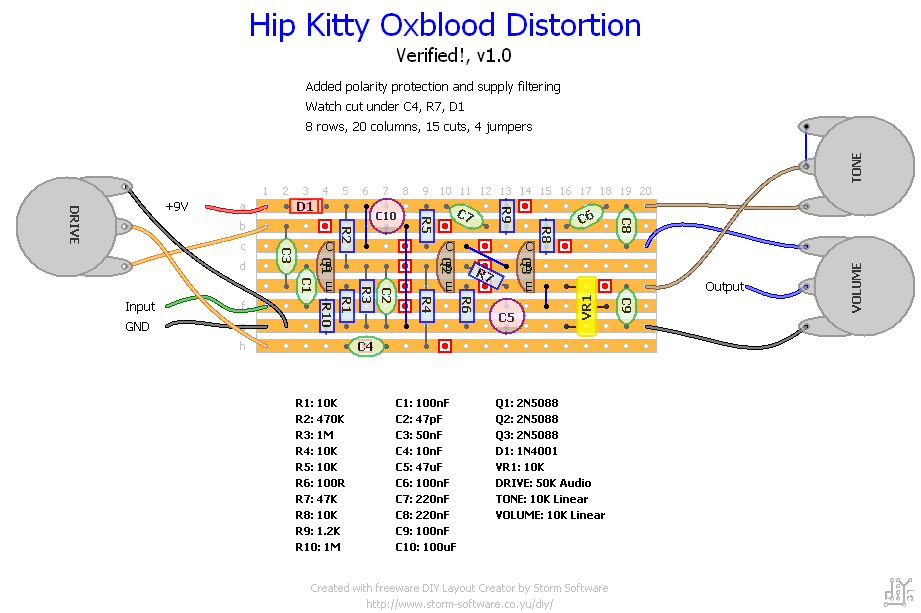
So if you want to build one up here's a vero layout for you;
More interesting stuff from Blackout Effectors now - the Mantra Overdrive. There's been some hype around this one *and* it comes in a gold enclosure! It doesn't get any better than that :-D
Here's the description of the Mantra Overdrive from the Blackout Effectors website;
"Equally capable of invoking the sacred sounds of a classically refined overdrive AND summoning wickedly raunchy drive, with more crunch on tap than the overdrive moniker usually entails. With such a wide palette of tones and character the MANTRA will feel just as at home at the feet of the stalwart blues crowd as it will the quintessential rock & roll protagonists.
The MANTRA utilizes amp-like circuit architecture, with multiple cascaded MOSFET and JFET gain stages to insure the most natural, touch-sensitive overdrive conditions possible and a seemingly endless range of clean-up with your guitar's volume knob. We burned a lot of midnight oil to make sure that the MANTRA could get down with vintage-type, low output single coils and hot humbucker pickups alike. From gently fingerpicked melodic phrases to bludgeoning riffs that you'll want to play over and over and over..."
With a ProGuitarShop demo video for you;
Sounds pretty sweet and does have a real range of gain available, it's nice and dynamic too - this'll be due to those multiple gain/clipping stages it employs! I always like my "amp like" overdrives (i.e. overdrive circuits that take inspiration from the structure of amplifier pre-amps) to have more tone controls than a simple "treble cut" - I don't think a treble cut gives enough of a convincing EQ curve - the use of the baxandall style tonestack works well though; a plus for the Mantra!
A gutshot of the Blackout Mantra - super clean wiring and construction.
Once again the freestompboxes lot had a peek inside a Mantra overdrive and managed to work something up. The thanks for the majority of work on this one go to KindaFuzzy and RnFR (the tracing was KindaFuzzy and schematic and PCB files are RnFR's);
The circuit structure is slightly more interesting than the standard "Tubes 2 Jfets" topology and shows how mosfets and jfet can be combined to really create an interesting and convincing overdrive clipping structure. The J201 always sounded a little dark to me but with the source resistor set higher as it is in the Mantra (10k) it seems to brighten up a little and not roll off so many highs. It would be interesting to have an option to run either the mosfet section or the jfet section independently for some cool lower gain tones - there's an idea for you modders out there :-)
The Blackout Effectors Twosome playing a bit of Table Football
Blackout Effectors make some really cool looking and sounding boxes. With their introduction into the ProGuitarShop product line I decided to take a look at a few of the nifty fuzz boxes they offer, in particular the Twosome Dual Fuzz and the two circuits which make up the Twosome - the Fix'd Fuzz and the Musket Fuzz.
Before we get started looking at schematics let's check out how the Twosome sounds;
Pretty cool. The sheer number of combinations available with the Fix'd make it one hell of an effect that you could play with for hours and still not find all the tones the Twosome is capable of producing (the red eyes of the owl and rabbit just make it extra special). The one criticism I would have is that you can only run one of the circuits at a time and not run the effects into one another and "stack" them up for even more versatility (although there is a special edition available which does enable you to run both circuits at once).
"The Twosome is a meaty fuzz sandwich made up of the Musket Fuzz pedal and the deluxe version of the Fix'd Fuzz pedal. Both circuits run independently in an A/B configuration allowing you to dial in your perfect fuzz or overdrive tone on each and then switch back and forth between them. You won't find more dirt under one roof - unless you live in a mud hut."
This is a gutshot from an early twosome pedal
So, we're going to need schematic's for both the Fix'd Fuzz and Musket to build one up. Never fear - both schematics are here! First up the Fix'd fuzz, I love the ant graphics;
Here's the description of the Fix'd Fuzz from the Blackout website;
"The FIX'D FUZZ V3 is the hydra-headed dragon of handmade fuzzboxes/boosts/overdrives. Replete with two polar-opposite fuzz tones, a full-bodied boost through light overdrive and a (wide) tone sculpting stage. It delivers BIG diversity in sound - all in a SMALL footprint package designed specifically for the cramped pedalboard. All 4 stages of the circuit are bypassable via their respective toggles, meaning you can add/remove from the stack as your black heart desires."
Fix'd Fuzz schematic (note the 3k9 resistor on the boost transistors emitter is actually 390R)
So, looking the the Fix'd Fuzz schematic there are 4 distinct stages - a standard boost transistor stage - as is seen in the first stage of the Big Muff or in the old Electro Harmonix LPB-1. The second stage "Fuzz 1" is the old DIY classic Hemmo's Bazz Fuss. The third stage "Fuzz 2" is a strangely mis-biased fuzz face circuit. The final stage is a tone control comprised of a Big Muff Pi filter and gain recovery stage.
The regular Fix'd fuzz only has controls for the Boost, Tone and Volume, the rest of the pots are inside as trim pots, the newer Fix'd Fuzz Deluxe has all the controls on the outside of the enclosure.
Fuzz Cat!
And finally the Blackout Musket Fuzz, here's the Blackout description;
"The logical progression from then to now, the MUSKET is based on one of the raunchiest, best selling fuzz circuits of all time - taken three giant muffy steps further. With the addition of the PRE, FOCUS & MIDS controls, the MUSKET is able to traverse the decades, the continents and the many iterations of the classic 4-stage fuzz circuit - from emulation to beyond. If you need fuzz and you need it to be massive...
And bass players, look no further. The Musket brings the thunder to perfectly compliment your lightning. You'll find the Musket on pro bass player boards the world over."
NOTE - You must take into account these corrections to the Musket schematic;
So yeah, as Blackout says it's a modified Big Muff - an essential weapon in any Guitarists armoury. The "Focus" control is basically a bass blend type control which allows you to dial in the level of bass that hits the front end of the clipping stages - I like this approach, I think removing bass before clipping greatly improves the clarity of the effect.
So if you're into fuzz there are two interesting options for you to look at, although the circuits are pretty standard the manner in which they are combined, especially in the Fix'd Fuzz, makes for some really interesting sounds.
The Mad Professor Snow White Auto Wah is a cool little envelope filter. Designed by Bjorn of BJF effects it always was going to be a decent design. Check out the demo video to see what this ice-cool pedal can achieve:
Well, the tracers fund over at freestompboxes got a hold of one and thanks to the work of several forumites (abflacken, Ice-9 plus many others) there's a schematic available:
My7of9 (from http://www.guitarpcb.com), has made a great post detailing some mods/improvements that he has made to the circuit. I've summerised them here, along with the circuit block schematic he provided:
"Here are a couple Mods with an explanation from our site (GuitarPCB.com) which some really seem to favour.
Install a 1N34 germanium diode in D6 and a 1uf electrolytic cap for C8 and the thing really came alive.Sounds much funkier clean and before a light overdrive it cops a great Garcia-Like tone.
In Regards to adjusting R18 as well as much more here is the explanation.
R18 mod - short answer - increasing R18 will allow you to set the Sensitivity more towards the 12 o'clock position. I'd go with a 47kΩ resistor here. The only advantage is being able to turn the signal down a bit further (50% to 0% is better than 20% to 0%) at the expense of turning the signal up (20% to 100% is better than 50% to 100%)
The circuit can be broken down into five main blocks:
Input buffer stage (blue) a high impedance input to get as much guitar signal as possible going into the circuit and a low impedance output to drive the next two stages.
State variable filter (yellow). Without getting too techie, this is the part that goes "Wah". If you are interested, look at the application notes (Google NE5517 or LM13700 data sheet) - warning !! this can be rather boring for normal sane people.
While we need to keep the signal going into the State Variable Filter (yellow) quite low, a slightly higher level signal might be needed for the envelope follower stages (green, pink and lilac).
The "green" stage boosts the signal, the "pink" stage converts the signal into a DC voltage, the DC voltage is proportional to the signal coming from the "green" stage - higher signal level, higher DC voltage level.
The DC voltage output of the "pink" stage drives the transistors in the "lilac" stage into producing a control current (more DC voltage at the base of Q2 means more current), the control current, which is connected to pins 1 and 16, tells the State Variable Filter (yellow) how much it should "Wah".
Since the question is about R18, a quick look at the "green" stage might be in order.
Nothing more than a gain stage. The gain is determined by whatever the Sensitivity pot is set at divided by the value of R18.
If the pot is set to 50% rotation, the resistance value of the pot (for a 100kΩ linear pot) is 50kΩ. Divide 50kΩ by 20kΩ - the value of R18 - and you have a gain of 2.5. If the input signal is 100mV, the output signal is 250mV.
So how did I arrive at a value of 47kΩ in the short answer ?
It would appear from many posts that setting the Sensitivity pot at the 9 o'clock position gives good results.
Since "9 oclock" is about 20% rotation, the value of the Sensitivity pot will be about 20kΩ.
The gain is therefore pot value divided by R18 which is 20kΩ / 20kΩ giving a gain of 1.
If I set the pot to 50% rotation, the pot value is now 50kΩ and if I change R18 to 50kΩ (47kΩ nearest standard value), the gain is 50kΩ / 50kΩ which is also a gain of 1.
It is possible to leave the value of R18 as it is (20kΩ;) and change the pot to a 47kΩ pot and still achieve the same results.
There is one other mod possible - called "side chain" which allows you to place effects such as fuzz and distortion before the auto wah and achieve good results. The only disadvantages are that you will require a simple buffer / splitter circuit (if you have got a Tonmann ParaMix available from GuitarPCB.com you won't need the extra circuit) plus you will need enough space on the enclosure to install another jack socket."
Here's a nice internal picture of the Mad Professor Snow White Auto Wah:
"Clyde McCoy was a jazz Trumpet player ... who developed a signature "wah-wah" sound in the late 1920s by fluttering a Harmon mute in the bell of his trumpet. In 1967, this distinctive sound was replicated for electric guitar with the introduction of the Vox Clyde McCoy Wah-Wah Pedal, the most significant guitar effect of its time. The Wah-wah pedal was invented by a young engineer named Brad Plunkett, who worked for the Thomas Organ Company, Vox/JMI’s U.S. counterpart. The wah circuit basically sprang from the 3-position midrange voicing function used on the Vox Super Beatle amplifier.
Vox cleverly packaged the circuit into an enclosure with a rocker pedal attached to the pot (which controlled the frequency of the resonant peak) and named the new device after Clyde McCoy. Early versions of the Clyde McCoy pedal featured an image of McCoy on the bottom panel, which soon gave way to his signature only before Thomas Organ changed the name of the pedal to Cry Baby. Thomas Organ’s failure to trademark the Cry Baby name soon led to the market being flooded with Cry Baby imitations from various parts of the world, including Italy, where the McCoy pedals were originally made."
Ok, so they were the first wah-wah pedals ever made but that doesn't explain why everyone wants one. Well, Jimi Hendrix, the man who is probably most associated with a wah pedal, used one - that's why everyone wants one.
The insides of the Clyde McCoy Wah.
Here's Hendrix on his Wah playing Voodoo Chile live at the Royal Albert Hall, probably one of the songs most associated with the use of a wah pedal and the reason the effect became so popular;
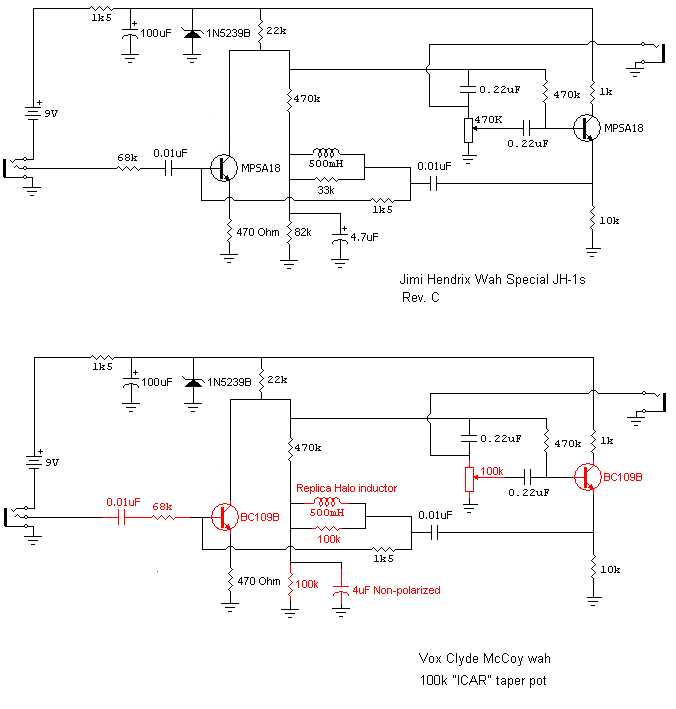
So, let's check out the schematic of the original Vox Clyde McCoy and compare it to the standard Cry Baby model (although it's noted as a Jimi Hendrix model it's just the same as a standard Cry Baby model) wah;
Ok, so there's not that much difference but it's a small circuit so small differences in components add up to make a large difference in sound. Firstly the transistors are BC109, these have a much lower HFE (gain) than the MPSA18 darlington type transistors used in the standard Cry Baby, this lower transistor gain leads to the wah having a much nicer and rounder bass response. The wah pot has an "ICAR" taper, these are vintage specs and replicas can be bought from various sources. The ICAR taper alters the feel of the wah and, as I find, gives you more quack on the toe end of the travel. Add together the other small differences in component values and you have the changes that make the McCoy wah unique.
Going back to the gutshot of the Clyde McCoy wah there are a few further things we need to take note of before we look to construct a replica;
The capacitors are old "tropical fish" style caps, many people believe these caps have their own sound and contribute to the character of the original Vox Clyde McCoy.
The wah inductor - it's known as a "Halo" style inductor (due to it's ring type shape). There are many people who build replicas of these inductors, one of the best comes from arteffect in Israel.
So, we want to build one now, you've got your old Cry Baby shell gutted and you're ready to build up the circuit. Here's what you need - a great vero layout from Sinner of turretboard.org;
The Marshall 100W Super Lead amplifier is a legendary source of endless guitar tone, it's sweet break up and aggressive edge made this amp the choice for many rock and electric blues guitar legends - Eddie Van Halen had a few, as did Hendrix. So, if you're still wondering why you should be interested in playing through one of these check out this demo;
It's got serious tone! But let's be honest here - not all of us can afford one of these machines, let alone be able to crank them up to the volumes required to really get the most out of them. So, what can we do? Well, runoffgroove.com have given us an option - the "Thor" overdrive pedal.
Modelled on the Marshall Super Lead circuitry using the runoffgroove Jfet Fetzer Valve "tube emulation" techniques the Thor aims to recreate all those great Super Lead tones in a controllable (and affordable) manner.
Let's look at the description from the runoffgroove website;
"Our primary inspiration was once again the Marshall Super Lead. Numerous old Marshall tracings and schematics were scoured for the definitive components that make up the famous sound. After trying many - if not all - of these arrangements, we have arrived at the values shown above.
The smaller Bright cap on the volume control is taken from the JTM and early Super Leads. This value allows a usable Bright setting without the harsh treble effect exhibited by the later amps. Beginning in 1969, the amps often had 5000pF caps that are almost always removed or replaced with a much smaller value.
The classic 470k/470pF filter preceding the second gain stage was chosen for its fuller sound. This is a later Super Lead filter with a lower break frequency than the older design, which gives a fuller sound.
The mu-amp section better simulates the odd order harmonics of the amp's Class AB push-pull distortion.
For those without a 4x12 cabinet, the added Bottom control closely mimics the bass resonance of the famous Marshall speaker arrangement.
All these ingredients result in a sound similar to the classic Marshall amp.."
And here's a demo of the Thor in action;
It does a nice job of getting you near those Super Lead tones. Admittedly it's never going to get you all the way - the sheer volume and smooth clipping of real EL34 output tubes add so much to an amp's sound it's impossible to completely recreate a screaming Super Lead with just a few jfets running at 9v but the Thor does a damn good job!
Ok, so it's time to check the schematic;
It's a nice little circuit; 2 common source jfet stages driving a mu-amp stage with a bass boost circuit on the end. To understand how they picked the values for biasing those jfet stages you can read the Fetzer Valve article on runoffgroove. It's got some great info on how careful biasing of a common source jfet stage can result in the jfet having clipping characteristics similar to a standard tube gain stage with the correct frequency response and harmonic generation, it's a great read and highly recommended if you're interested in jfets :-)
For those of you wanting to build the Thor here's a perfboard layout;
Guillaume Fairfield of Fairfield Circuitry makes some cool pedals, and his circuit designs are refreshingly interesting. The Barbershop Overdrive is one of the most interesting, a nice transparent overdrive/boost pedal (I would say it's an overdrive/boost pedal as the gain in this thing isn't super high) with a cool "Sag" control that controls the voltage the pedal's circuitry is running at and alters the compression and colouration of the overdrive. You can use the Barbershop to stack with your other dirt pedals in so many different combinations - it adds a great touch sensitivity and sparkle to almost any circuit!
"Have you ever sat in a barber's chair wishing your tone was as slick as your freshly shaved upper lip? With the Barbershop Overdrive on your pedalboard, you could keep your moustache and sound good doing it.
The Barbershop is an original design, not a clone.
Raw, gritty, warm, smooth, open and transparent are all terms that have been used to describe this overdrive. It sounds great with any setup, but truly shines when used to dirty up a tube amp."
Here's the customary ProGuitarShop demo video of the Barbershop Overdrive in action;
Not only are Guillaume's designs interesting they are also well thought out and manufactured to a great standard. Here's a gutshot for the Barbershop Overdrive (check out the cool logo on the PCB!);
So, without further rambling (and with thanks to WhiteKeyHole and Guillaume) here's a schematic of the Fairfield Barbershop Overdrive;
So what have we got? It's two cascaded Jfet gain stages followed by a simple NPN transistor emitter follower. The mosfet device is there for polarity protection. The 10kB pot is the "Sag" control that affects the overall supply voltage to the circuit and the clipping in the cascaded jfet/emitter follower stages. Guillaume has suggested that he sets the bias of the two jfets at around 2/3 of the supply voltage (when measured at the jfet's drain). I'd replace the drain resistors with 25k trim pots which will allow you to dial in the 6.66v bias point a little easier than using trial and error with set resistors.