Welcome to the Revolution

Hi there, welcome to my blog - La Revolution Deux. It's an odd name - but I like it! Here you will find all the info on my various DIY Guitar effects builds, amplifiers and guitars. Everything from a humble Ibanez tubescreamer to the holiest KLON Overdrive.

You may also find a few effects builds that I am looking to move on - usually in exchange for other effects/gear/cash. You can always check my ebay account to see what I've got up for grabs.

Have fun, enjoy the blog - Fred Briggs :-)

CONTACT ME


Feel free to get in contact with me about anything you see on this blog or with any general questions about guitars, amplifiers and effects, I'll be happy to answer! Just click the button above to email me directly or alternately my email address is fredbriggs2007 [at] googlemail [dot] com

Search This Blog

Showing posts with label Fred Briggs. Show all posts

Saturday, 30 June 2012

Diamond - Compressor

[This post contains information on the Diamond Compressor & Fred Briggs Diamante]

Diamond make some real high-end stuff; the Memory Lane Delay, Halo Chorus and J-Drive are all top level (expensive!) pedals. My overall choice from the Diamond pedal range is the Diamond Compressor though. It gives a nice compression effect, not the super transparent kind, you can feel the squish but it's not over powering and the "tilt" EQ is a nice addition too allowing you to gently shape your overall tone. Ok, so it's a great sounding compressor and has loads of great features, but my favourite bit; the LED that changes colour with the compression level! Ha.

Here's a description from the Diamond website;

"Recording studios often use rackmount 'vocal channels' - a mic preamp, compressor, and EQ all in one unit as a front end for vocal recording.
The Diamond Compressor is our take on a 'guitar channel' - a dynamics and tone shaping tool for live and studio use - with low-noise, ultra-linear signal buffering, smooth opto-based compression, and a versatile 'tilt' EQ that musically shifts overall frequency balance. All in a user-friendly 3-control package - just Comp, EQ and Volume.

Features:

- Vactrol opto-isolator variable resistance path as used in high-end studio compressors for smooth attack and decay characteristics while preserving initial signal transients.


- Premium audio components, including 2% polypropylene capacitors,1% metal film resistors and a pro audio grade  opamp (our signal path opamp alone costs 8 to 10 times
what the industry norm uses).

- Post-compressor 'tilt' EQ provides a very musical tailoring of frequency response - seamlessly transition from a darker jazz voicing to a brighter jangle, with flat frequency response at the center detent position.
- Double filtering stage in side chain to eliminate low frequency modulation while preserving fast compression response.
- Dual AC capacitive coupling paths for improved transient response.

- Bi-color LED provides visual indication of depth of compression.


- True bypass signal path.


- Battery or standard negative tip 9V DC adapter operation, can be powered from 9 to 24 V negative tip."


Here's the ProGuitarShop video;


Now here's a gutshot (also from the Diamond website);


And, thanks to some incredible work by WhiteKeyHole, a schematic;


So, interesting parts of the design - the Tilt EQ is taken from an early 70s stereo preamp designed by Quad Ltd, it gently tilts the eq around 900Hz simultaneously boosting treble and cutting bass and vice versa (mid position is a flat response). It's a great tool for smoothing out EQ ranges and matching various pedals up to one another without sounding too drastic and overpowering other pedal's tonal characteristics. Another addition not normally seen in stompbox design is the current source that has been added to the emitter follower buffer stages. The addition of the current source to these stages reduces the THD (Total Harmonic Distortion) from 0.01% to 0.001% - not something you're really going to hear in a guitar orientated world! Those paralleled capacitors too - not really necessary!

Here's a closer look at the Tilt control schematic;

And a graph of the EQ response curve (note the phase inversion of the signal at extreme settings of the control);


After looking at the Tilt EQ schematic you'll notice that the bypass resistors R13 & R14 have been left in the Diamond design even though they are not needed, you could in fact remove them and not notice a difference.

Parts List;

Capacitors 
NOTE - C33 on the schematic is C32 on this parts list.
Caps 2u2 and higher are electrolytic. C22/23/30/31/32 are ceramic, all other film
C1 47u
C2 47u
C3 47u
C4 5n6
C5 5n6
C6 330n
C7 100n
C8 100n
C9 100p
C10 820p
C11 100p
C12 820p
C13 1u
C14 100p
C15 330n
C16 820p
C17 820p
C18 100n
C19 10n
C20 10n
C21 2u2
C22 100n
C23 100n
C24 820p
C25 3n3
C26 15n
C27 10n
C28 4u7
C29 3n3
C30 100n
C31 100n
C32 100n

Resistors
All metal film 1% except R1 which is carbon film 5%
R1 100R
R2 10K
R3 10K
R4 100R
R5 15K
R6 3.32K
R7 22.1K
R9 15K
R10 47.5K
R11 47.5K
R12 47.5K
R13 47.5K
R15 1M
R16 475R
R17 475K
R18 475K
R19 3.32K
R20 6.41K
R22 100R
R23 475K
R24 22.1K
R25 100K
R26 1K
R27 3.32K
R28 475R
R29 221K
R30 475K
R31 100K
R32 221K
R33 100K
R34 475K
R35 221K
R36 10K
R37 1.5K
R38 10K
R39 Jumper
R40 10K


Transistors are standard NPN/PNP medium gain
LED is a Tri-colour type.


For those after a layout to build this thing check out Harald Sabro's great layout here; http://www.sabrotone.com/?attachment_id=2157

Here's the freestompboxes.org forum topic; http://freestompboxes.org/viewtopic.php?f=7&t=850

Now, I previously mentioned that the Diamond has many superfluous parts and circuit structures so I decided to simplify it right down. Here's what I came up with;


Basically it's the same circuit as the Diamond just as simple as it can be; the buffers have been removed or simplified and the EQ section has been removed completely leaving controls only for "Compression" and "Volume".

Wednesday, 20 June 2012

Fred Briggs - Pharmacy Fuzz


Here's something I've never seen before in a Fuzz Face type circuit; adjustable gain darlington pair transistors made up of individual germanium and silicon transistors. The first transistor of each pair is a germanium device of around 50hfe (low leakage!) and the second is a silicon device of around 250hfe. The adjustable nature of the transistors makes the Pharmacy Fuzz capable of a huge array of both vintage and modern fuzz tones - you can tweak and play with the circuit for hours and still find new possibilities.

When I build this up I'll be using a 100k trim for the gain control on the first transistor set and a 100k pot for the control on the second transistor set as this secondary pair is where most of the clipping magic happens (or indeed just use a single low/medium gain transistor instead of the first pair for simplicity). Also note the "Aggression" and "Bass Cut" controls. The "Aggression" control works as a circuit wide "overall gain" control and allows the circuit to go from mellow to full on rock out. The "Bass Cut" is just an implementation of the now pretty standard Fuzz Face tone blend control and governs the amount of low end signal that the circuit will gobble up at it's front and and fuzz out at it's end.

The 10k trim is there for bias - use this to set the voltage on the collector of the second transistor set to around half the supply voltage, or to wherever you think it sounds best!

You'll also note a few other little inclusions in the design - the 2 x Ferrite Bead inductors in series with the input of the circuit and the Suppression Choke in the power supply (whose overall resistance should be in the 50-100 ohm) region. These components together help to reduce noise and radio interference in the circuit. If you don't have them replace the suppression choke with a 100 ohm resistor and just omit the ferrite beads.

Tuesday, 3 April 2012

Fred Briggs - Tourbox #1


Here's a couple of images of the pedals that will soon be whizzing their way around North America as part of the first tourbox I've ever done! On the left is the "Psychadelia Fuzz", a sweet overdrive/fuzz which can produce an awesome nasty octave/ringmod effect. On the right is the "Rangemaster MKII", my take on the classic Rangemaster Treble Booster. With the addition of darlington paired germanium and silicon transistors, and "Filter" and "Aggression" controls it has a huge tonal range. Centrally is the "Unknown Fuzz", a more traditional fuzz box that uses piggy-backed silicon transistors to emulate the warmth of germanium transistors without all the draw backs!


Fred Briggs - Rangemaster MKII Build


The second steel enclosure has been used - and here's the outcome. I built a version of the Rangemaster I call the "MKII". It uses a germanium and silicon transistor in a darlington pair to open up a huge amount of options. This has been done before as Pete Moore showed with his "RangePig" treble booster, I just chose to expand on the idea and add a few further modifications and refinements;

- a "Filter" contol to slide between a full range and treble boost, 
- an "Aggression" control to allow you to blend in the mellow germanium tone with the more aggressive silicon sound 
- and a Bias trim pot to allow you to dial in just the right voltages on those transistors to ensure you get the very best tone from them). 

Anything from standard Rangemaster treble boost right on to almost a fuzz faceish boost is available with this circuit. With the inclusion of all the modifications and refinements it becomes a very versatile booster pedal and a worthy addition to your pedal board.


And here's the schematic:


Wednesday, 28 March 2012

Fred Briggs - Unknown Fuzz


A new fuzz design from myself. It's silicon transistor based but with a difference. I've been playing around with the old Vox Tonebender circuit for a while and this is what sprung from those experimentsTaking inspiration from the Fred Briggs Fuzz I made a few years ago that used "piggy-backed" silicon transistors to emulate lower gain germanium devices I used a couple of piggy backed high gain silicon trannys in the first stage with the hfe set to 25. This first stage pushes a NOS BC108 transistor in the second stage - it sounds great, there's no ear shredding like the usual silicon fuzz boxes just a nice fat low end and a warm mid section. The three controls are for 1; a bass cut, 2; a width control (which adjusts how "wide" and gainy the fuzz sounds) and the third is just a volume control. As you can see there is no "usual" gain control, that's because the only gain control you need is your guitar's volume knob, it'll do everything from mild overdrive right through to full on FuZzZzZzZz.

So, here's the schematic for you:


*NOTE* - To further control the high end and upper mids I would recommend you add in a 2n2 cap in parallel with the 22K resistor and 100kB "Width" pot. It really calms down the harsh frequencies. I included the 2n2 cap on my final build!

*NOTE 2* - Piggy backed transistors are a little picky, you may have to pair up a few 2N5088 transistors before you find a couple that are happy together :-)

I'll be updating this with a sound sample as soon as possible!


Wednesday, 21 March 2012

Fred Briggs - Psychedelia Fuzz / Overdrive


So, here is the first pedal to be housed in those new enclosures I've had built. It's a one off custom design by myself - a Fuzz hybrid that is capable of any tones ranging from a simple boost right up to full on octave/ring mod Fuzz meltdown. All hand built point to point on vero board, it's one of my best builds ever - solid as a tank and neat as you like...

Hopefully I'll get some sound samples up a.s.a.p when I get someone with recording equipment down...

[EDIT] - Here's some terrible quick demos of the Psychedelia in action, they by no means illustrait all of the tones you can get from this thing but it gives you a good idea. I recorded them with a guitar that only had 5 strings at the time and a "no name" crappy mike - but don't let that fool you - the reason they sound so shoddy is my broken fingers playing ;-) : http://soundcloud.com/fred-briggs/sets/fred-briggs-psychedelia-fuzz


Thursday, 15 March 2012

Fred Briggs - Wah Wah


Here's a Wah Wah I've built. It's based around the old Vox Wah (How can you tell!?) but it's got a few cool extras:

1) Input and output buffers so you can use it with all your stompboxes without it playing tricks on you.

2) Adjustable "Blend" control which allows you to blend in some clean signal with your Wah, this actually makes a real difference and allows you to wah wah away without completely Wahing out everything else you're trying to do. It's one of the best mods I've done to a Wah. You could in fact use the circuit I installed to run a "dry" signal FX loop which would then allow you to place more FX into the dry part of the blend circuit. Very cool but I haven't yet done that - this is enough for now!

3) Standard cap, inductor and resistor tuning to suit your own tastes!

Tuesday, 28 February 2012

Fred Briggs - Super OCD

Fred Briggs - Super OCD Schematic
The Fulltone OCD has been an overdrive favourite for many years now. It's got a really nice tone when your amp is set right (I prefer it with Marshalls I must say). Well, I've always thought about modifiying the basic circuit (which itself is based around the old Voodoo Labs Overdrive) to give it a little more variety and use over a wider spectrum of tones.

As you can see the "Super OCD" has a few extra controls:

- Firstly the "Bass" control - it's nicked from Paul C's Timmy pedal and works very well to add in pregain bass for more low end response.

- Secondly the "Saturation" control, this allows you to increase the clipping headroom of the circuit and have an overall "cleaner" tone while dialling in just the required amount of diode clipping.

- Thirdly the "Boost" control, I've configured the second opamp to allow a range of clean boosts to be selected to really allow you to push the front end of your amp into overdrive.

- The final control I've added is a switch to go between 9 volt and 18 volt operation. The 18 volt operation adds extra headroom to the circuit to stop the opamp clipping from fogging up the tone. The 9 volt operation retains the original headroom seen in the OCD.

- Other changes include alterations to the Tone control and a swap of opamp from the TL082 in the original OCD to the Burr Brown OPA2134. These changes all add up to create a really nice overdrive/distortion box. It's got all the original Fulltone OCD tones in there and loads more. If you like the original OCD you'll love the Super OCD :-)

Here's a vero layout by beedotman, it's unverified at the moment, if you build it report back please :-)


Here's the discussion topic on freestompboxes.org: http://freestompboxes.org/viewtopic.php?f=13&p=183753

Fred Briggs - E11even - Marshallesque Booster/Overdrive


Here's the schematic:


And here's the last in my series of Fender / Vox / Marshall themed boosters/overdrives - The "E11even" (Spinal Tap reference intentional). It's designed for those classic Marshall overdrive tones, plexi / jtm45 sort of stuff. It's based around the old mosfet booster design I love with a few tweaks. The bias control is essentailly a saturation control for those diodes, setting it high gives you more headroom and a smoother more spanky (hehe) overdrive, a lower setting gives a more gritty tone. The Body control allows you to alter the bass content and overall frequency gain structure of the circuit. When the body is at 470k you've got the classic Marshall mid/high boost filter (almost, with that 1M resistor to ground you don't quite get the same level of low end roll off but it works with this setup). One suggestion I have for a mod is placing the saturation control over one diode only so that you can dial in some really interesting (and extreme!) asymmetrical clipping structures...


For the protection diode you can use a 12v zener or just a red LED. I use a 470kB (linear taper) pot for the Body control but some may like the taper of a log pot here - it's up to you...

Saturday, 25 February 2012

Fred Briggs - 'Face - Fenderish Booster/Overdrive


Here's the Face MKI schematic:


I really like this one, it's a booster/overdrive with a nice Fendery feel and voice to it. As you can see there are some values which you can alter on the schematic that allow you to tailor the tone to your exact needs. Firstly the supply voltage - the lower the voltage the less overall gain and clipping you'll get, more voltage = more gain and clipping. The jfet choice also makes a difference to the tone of the circuit; 2N5457s give more gain but are more compressed sounding (better for the Fender "tweed" emulation) than the MPF102s (better for the larger Fender "twin" type emulation) which have more headroom but less gain. You can use almost any jfet type in this circuit 2N5458, J201 (I didn't like these, they were too compressed and gainy - almost fuzzy!), you just need to find your type! If you want to learn a little about jfet's and their properties check out this article over at runoffgroove: http://www.runoffgroove.com/fetzervalve.html. Finally the 3n3 tone cap can be altered to your preference, a higher value will lower the high end gain, a lower value will allow more high end drive.

In my final build I'll be using MPF102 jfets running at 18V with a 4n7 tone cap to keep the high end under control. This setup provides a nice "cranked twin" tone and is really dynamic and reactive to your playing, a decent low end is retained while it still fizzes out at higher gains.


Here's the schematic for the version I built up (note the altered tone control which, I find, works better with the MPF102 jfets):


I took inspiration  from a range of sources for this little circuit; firstly this patent from 1943: http://www.muzique.com/amz/SRPP.pdf

And this microphone preamp (1997):


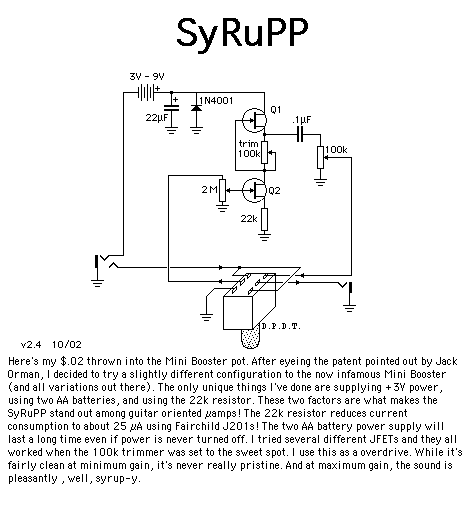
And one of Tim Escobedo's excellent circuit snippets - the Syrupp Booster (2002):

All comments are welcome, for the freestompboxes.org topic check here: http://www.freestompboxes.org/viewtopic.php?f=13&t=16321

Friday, 10 February 2012

Fred Briggs - '64 - Vintage Vox Tones Galore!


Here's another (nearly) new one from me. It's a tricked out super mod of the old Electro Harmonix LPB-1 circuit that produces some lovely singing overdrive tones reminiscent of an old VOX from their 1960's heyday. I took the Lovepedal Englishman (A supposed Vox AC30 / AC15 emulator) as a base and went from there - Firstly I wanted a little more gain, hence the 4k7 collector resistor. Along with more gain I wanted more emphasis and clipping on the higher mids to replicate that treble laden Vox overdrive hence the 82nF bypass cap and the 47k/22nF mids filter at the end of the circuit. These changes make the circuit sound livelier and give it more character. The use of the *super* low forward voltage SB340 diode in combo with the BAT46 diode produces harmonically rick asymmetrical clipping, the levels of which can be controlled using the "Headroom" control. The headroom control also allows a nice rich low end to be retained while allowing the top end to be clipped, as you roll back the clipping a nice tube like "note attack sag" effect becomes prominent - it's quite pleasing and cool to play with. The use of the 2N3565 transistor is due to some tests carried out a while ago where it was found that the 2N3565 sounded best in these sort of applications, you can replace it with a 2N5088 or BC108 or, in fact, any decent gain NPN transistor.

Here's the schematic for you:


Here's the freestompboxes.org forum thread where there's some discussion on the design: http://freestompboxes.org/viewtopic.php?f=13&t=16153

Here's some images of the finished pedal:


Classic vintage Vox tones. You'll notice this version has a diode switch installed which is basically the same as the Lovepedal Englishman's set up (But instead of the dual BAT 46, there's the BAT 46/SB340 combo) that lets you alter the diode settings between BAT 46, 1N4148 and nothing. The switch is used in series with the "Headroom" control to add an extra dimension of tones..

Saturday, 4 February 2012

Fred Briggs - Dual Band Vibrato


Here is a new design from myself. As far as I know it's a concept that hasn't been explored before (Although the Catalinbread Harmonic Mesmeriser uses a similar technique with an LFO running with opposite phase outputs to drive dual tremolo/vibrato circuits). Essentially the signal is split into two parallel paths - one path for treble and one path for bass. Using the dual LFO setup you can set your own depth and speed for each frequency band, this makes for some really strange effects with pseudo phase shifting occurring due to the cross over in frequency bands and the resultant signal cancellations. Some settings give a clear vibrato, others sound almost "uni-viby". I like setting the bass to a slower vibrato with the treble set quite quickly, it gives a really ethereal quality to your tone. Add in a bit of delay and you're into real psychedelia!

This project is currently not finished, although it does sound damn good so far, I'm still exploring all the possibilities that this concept holds. There is a thread over at freestompboxes.org detailing it's continuing progress: http://freestompboxes.org/viewtopic.php?f=72&t=15956

Once I've got this circuit finished I'm thinking about building a few up and sending them around as demo boxes. Yep, I like this circuit that much!

Tuesday, 31 January 2012

Fred Briggs - Octave Ringmod Fuzzer (ORF)

Here's the next new project from myself. It's a fun little circuit for you, inspired by Tim Escobedo's Tripple Fuzz. At lower gains it creates a really sweet tone, push it high and it gets truly evil! Stack it into other gain pedals for an absolute fuzz out heaven :-)

Here's the schematic:


The transistors I used where BC557 and BC548, the op amp was a LF351. The optional J201 gain stage adds a lot of character, I prefer this build with it...

Fred Briggs - Bliss; Overdrive/Boost/FX Loop

Here's a new little project for you. I designed it for a friend who wanted something that would give his old pedals a new lease of life, well here it is. You stick your old gain pedal into the loop and whoosh -> extra life. More dynamics, more warmth, it's all there. Here's the schematic:


Wednesday, 29 July 2009

Fred Briggs - Hummingbird Overdrive

Here's another one. I've had a lot of emails for this one. The best way I can describe it is as an "enhancer" - it makes and already good overdrive tone better! It produces a great low overdrive, the compression and shimmer controls are very interactive with regard to both the gain/clipping structure and the overall tone and feel of the device..

This design was born from a challenge set to me and a few others by Bjorn of BJF effects to build a circuit that sounded like the honeybee. Soulsonic came up with a very elegant and simple design called the Hunny Bunny: http://www.soulsonicfx.com/?page_id=88 (I love that circuit). The Humming Bird De'luxe is what I came up with and you can see the schematic below.


Here's a vero layout by Harald Sabro (http://www.sabrotone.com):


[NOTE] One of the capacitors is marked as 47k on the schematic - this should read 47n. Point B goes to the input of the mosfet stage.